How to Build a Sofa Table with Outlets: Step-by-Step Guide
To build a sofa table with outlets, you cut a hole in the tabletop, install a recessed power strip or grommet outlet, and run the cord down the back leg to the wall. It takes about a weekend, basic tools, and roughly $100 to $200 in materials. The result is a table that charges your phone and powers your lamp without ugly cords draping over the edge.
Why go to the trouble? Because a console table behind your couch is prime real estate for devices, and nobody enjoys crawling behind furniture to plug something in. We researched dozens of DIY plans and found that most builds use a prefab power grommet, which keeps the wiring safe and hidden. Many experts say this is one of the easiest furniture electrical upgrades you can do.
- Pick a sturdy table design (or use one you already own) and measure your space.
- Buy a recessed outlet or power grommet rated for home use.
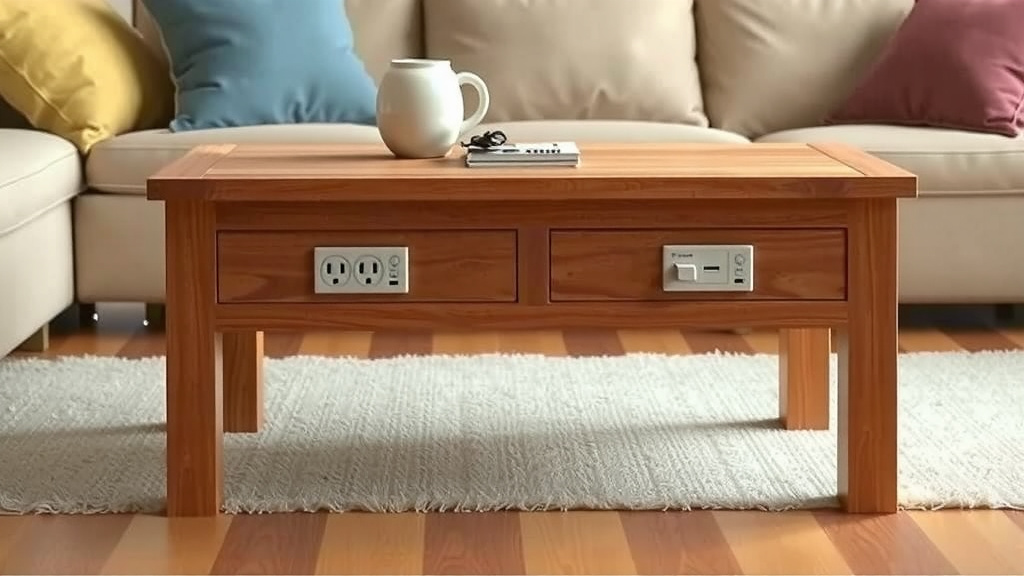
- Drill or cut a hole in the tabletop and drop the unit in.
- Run the power cord safely down the back leg to the nearest outlet.
- Sand, stain, or paint, then test everything before you load it up.
Below, we walk you through the whole process step by step, from choosing your materials to flipping that breaker-safe final switch. Grab a coffee, and let’s get building.
Building a Sofa Table With Built-In Outlets Step by Step
The fastest path is this: build or repurpose the table, cut a hole for a power grommet, drop it in, and run the cord down a back leg. Below, we break each part into bite-size steps so you never feel lost.
Step 1: Choose Your Table Design and Size
Start with the space, not the plan. Measure the gap behind your couch and note the width you can spare. We found that most sofa tables run 28 to 30 inches tall, which lines up nicely with the back of a standard sofa.
You have two options here. Build from scratch with pine or plywood boards, or grab a thrift store table and upgrade it. Honestly? Upgrading an old table is the easier route for beginners. If building furniture from zero appeals to you, our guide to how to build a sofa from scratch covers the full process.
Step 2: Gather Your Tools and Materials
Here’s your shopping list. Nothing fancy, we promise.
- A power grommet or recessed outlet strip (UL-listed)
- A 2 to 3.5 inch hole saw or jigsaw
- Drill with driver bits
- Wood, screws, wood glue, and brackets if building from scratch
- Sandpaper (120 and 220 grit) plus stain or paint
- Cable clips or a small wire channel
Many experts say to buy a UL-listed grommet only. That certification means the unit passed safety testing, and it matters when electricity is involved (CPSC).
Step 3: Build or Prep the Tabletop
If you’re building from scratch, join your boards with glue and pocket screws, then add aprons underneath for support. Let the glue dry overnight. Rushing this step is like pulling cookies out of the oven early — disappointing and hard to undo.
Step 4: Cut the Hole for the Outlet
Mark the grommet location about 4 to 6 inches from the back edge. Centered looks good, but back placement hides cords better.
- Trace the grommet base with a pencil.
- Drill a starter hole inside the line.
- Cut with a jigsaw, staying just inside your mark.
- Test-fit before you sand. Snug beats sloppy.
Drilling from below first, then finishing from the top, helps prevent tear-out on the visible surface.
Step 5: Install the Power Grommet
Drop the unit in, then tighten the locking ring from underneath. Most grommets hand-tighten. No electrician needed, since you’re plugging into a wall outlet, not wiring into the wall. That distinction is what makes this a DIY-friendly project.
Running the Cord Safely Down the Leg
The safest route runs the cord inside a wire channel screwed to the back leg. This keeps the cord away from vacuums, feet, and curious pets. The CPSC warns that damaged cords are a leading cause of home electrical fires, so protect yours.
Secure the cord with clips every 8 to 10 inches. Leave a little slack near the floor, then run it to the wall outlet. Never staple through a cord or pinch it under a leg.
Best Cord Management Tricks
We found that a few small touches make a big difference:
- Use a flat plug or short extension cord at the wall.
- Add adhesive cable clips under the tabletop for lamp cords.
- Velcro ties beat zip ties because you can reopen them.
Finishing Touches: Sand, Stain, and Seal
Sand with 120 grit, then 220 grit, always with the grain. Wipe off dust with a tack cloth. Stain or paint next, and finish with two coats of water-based polyurethane for a surface that shrugs off coffee mugs.
Testing Your Outlets Before Use
Before you load the table up, plug in a phone or lamp and test each outlet. Check that the grommet sits flush and the cord doesn’t wiggle. A $10 outlet tester from any hardware store adds peace of mind and catches wiring faults in wall outlets, too.
Pre-Build Checklist
Print this or screenshot it. Future you will say thanks.
- Measure the space behind your couch and the table height.
- Buy a UL-listed grommet with the number of outlets you need.
- Confirm your hole saw or jigsaw matches the grommet size.
- Plan the cord route down the back leg before assembly.
- Pick a finish that matches your room’s colors.
- Set aside a full weekend, including drying time.
Common Mistakes and How to Avoid Them
Even simple projects have potholes. Here are the ones we found most often in DIY forums and build logs.
Cutting the Hole Too Big
Measure twice, cut once. If the hole ends up oversized, a ring of felt tape or a thin wood shim fills small gaps and stops wobble.
Skipping the Cord Protection
A bare cord dangling behind the table is an invitation for trouble. Use the channel. It costs a few dollars and looks cleaner anyway.
Cost and Time at a Glance
Budgets vary, but here’s a realistic breakdown to help you plan.
| Item | Typical Cost | Time Needed |
|---|---|---|
| Lumber or upcycled table | $40–$90 | 2–4 hours |
| Power grommet | $25–$60 | 30 minutes |
| Finishing supplies | $20–$40 | 3–4 hours plus drying |
| Cord clips and channel | $10–$15 | 20 minutes |
Add it up and you’re at roughly $95 to $205. Compare that to designer charging consoles that run $400 or more, and the math starts smiling at you.
When to Call a Professional
If you want a hardwired outlet built into the wall behind your couch instead of a plug-in grommet, hire a licensed electrician. Many local codes require it, and some grommet models are rated only for corded use. When in doubt, a quick call to your local building department settles it.
Conclusion
Building a sofa table with outlets is one of those rare projects that looks impressive but asks very little of you. Pick a solid table, cut a snug hole, drop in a UL-listed power grommet, and protect the cord on its way down the leg. A weekend of work and about $200 gets you a charging station that hides every wire and skips the $400 designer price tag. Your phone stays charged, your lamp stays lit, and your cords stay out of sight. So here’s your next move: measure the space behind your couch tonight, and order that grommet before the weekend hits.
Frequently Asked Questions
Can I install an outlet in a sofa table without any electrical experience?
Yes, as long as you use a plug-in power grommet rather than hardwiring anything. The grommet plugs into your wall like a lamp does, so there’s no wiring involved. If you can use a drill and a jigsaw, you can handle this project.
Will a power grommet damage my table or reduce its resale value?
The hole is permanent, but it sits toward the back edge where it’s barely noticeable. Many buyers actually see built-in outlets as a bonus feature. If you’re worried, practice on a thrift store table first and keep your nice one untouched.
How many devices can I safely plug into a sofa table with outlets?
Stick to what the grommet is rated for, which is usually printed on the unit or its packaging. A lamp, a phone charger, and a tablet charger together draw very little power. Avoid plugging in space heaters or high-wattage appliances, since those pull far more current than a furniture outlet strip is designed for.
Do sofa tables with built-in outlets pass safety codes?
Plug-in grommets don’t fall under electrical code the way hardwired outlets do, because you’re not modifying your home’s wiring. Just choose a UL-listed or ETL-listed unit and plug it into a grounded wall outlet. If you ever decide to hardwire one directly into the wall circuit, that’s when a licensed electrician becomes necessary.
Can I add outlets to a table made of MDF or particle board?
You can, but go easy when cutting. These materials chip and crumble more than solid wood, so score your cut line with a sharp blade first and use painter’s tape to reduce tear-out. A fine-tooth jigsaw blade also makes a cleaner hole in engineered wood.